


How to Untangle a Necklace or Jewelry Chain Without Losing Your Mind (or Breaking It)
- ER Kent

- Jul 26, 2025
- 4 min read
We’ve all been there: You open your jewelry box or travel pouch, reach for your favorite necklace, and find it twisted into a tiny, snarled mess that looks like it survived a tornado.

Maybe it's knotted around itself—or worse, around another chain. Cue the eye twitch and deep sigh.
But before you give up and say a silent goodbye to that delicate gold chain, take a breath. Untangling jewelry doesn’t have to ruin your day—or your manicure. With a few tried-and-true tricks (and a little patience), you can get your necklaces and bracelets back in wearable condition, no tears required.
Here’s how to do it like a pro, without losing your cool—or your chain.

First, Don’t Pull. We Repeat: Don’t Pull!
Your first instinct might be to give the chain a good yank, especially if you’re in a rush. But resist the urge. Tugging at a knot only tightens it, especially with fine or thin chains, which can make the situation a lot worse—and sometimes irreversible.
According to expert jewelers at Blue Nile, pulling too hard can warp or snap delicate links. So treat your tangled jewelry the same way you’d treat a kitten with claws in your curtains: gently, and with strategy.

Find a Flat, Bright Work Surface
Light matters here. Choose a flat surface like a table or countertop and set up in a bright area, ideally near a window or under a good lamp. Lay down a white towel or dishcloth to create contrast—this will help you actually see the tangle and stop the chain from sliding around too much.
Pro tip: the towel also acts as a soft landing in case you drop any tiny clasps or chain ends.

Use Baby Oil or a Lubricant (Yes, Really)
A tiny drop of baby oil, mineral oil, or even olive oil can make a huge difference in loosening a stubborn knot. Jewelry experts at JTV recommend applying a small amount with a cotton swab or your fingertip right on the knot.
The oil helps the chain slide against itself more easily, making it easier to tease the knot apart. Don’t worry—you can clean the chain afterward with a little mild dish soap and warm water.
If you're working with silver or costume jewelry, skip anything acidic like lemon juice or vinegar. Stick with neutral oils to avoid tarnishing or damaging coatings.

Grab Two Straight Pins or Safety Pins
Once you’ve applied your lubricant, use two straight pins, safety pins, or even fine-pointed tweezers to gently work the knot loose. Jewelry pros at Martha Stewart suggest inserting the pins into the center of the knot and slowly widening the opening by pushing the pins in opposite directions.
You can also try rocking the pins slightly back and forth to wiggle the loops free. Be patient—this is delicate work. But once you loosen that initial tight spot, the rest of the knot usually unravels quickly.
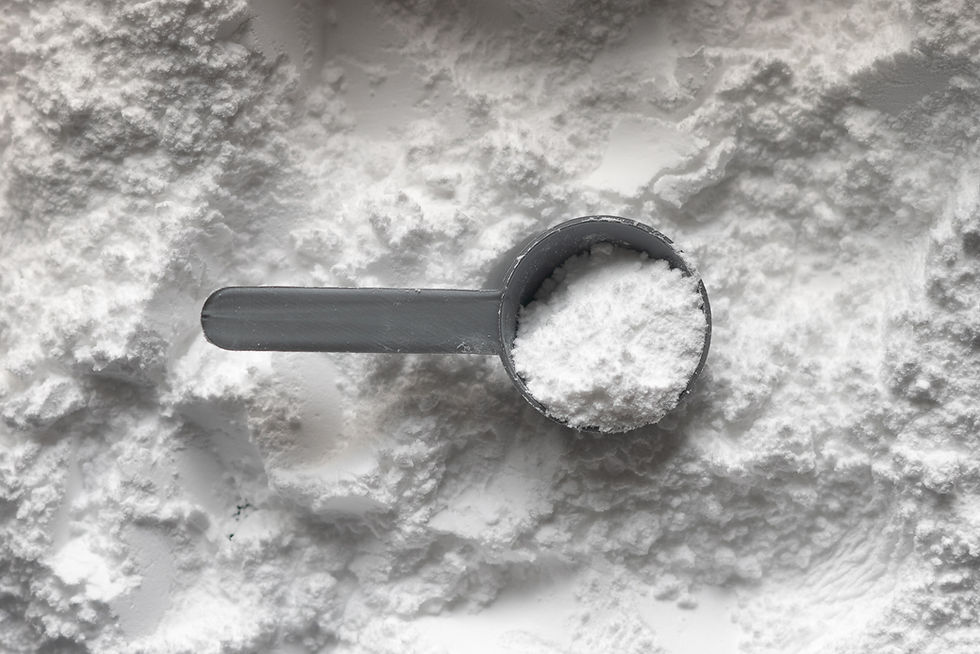
Still Stuck? Try Baby Powder or Cornstarch
If you’re out of oil or working with a chain you’d rather not get greasy, you can try a sprinkle of baby powder or cornstarch instead. These act as dry lubricants, helping the links slide over each other more easily.
Sprinkle a little on the knot, work it in with your fingers, and then use your pins or tweezers to gently pull the chain apart. It’s messier than oil, but some people find it less intimidating—especially if you’re worried about cleaning precious metals.

Use Gravity to Your Advantage
If the chain is long enough, let part of it dangle off the edge of your work surface while you work on the knot at the top. Gravity can help loosen tension in the chain, making it easier to untangle.
Just make sure it’s not dangling too far—or anywhere near a curious cat.
For Multiple Chains Tangled Together: Separate One at a Time
When two or more necklaces have bonded like long-lost vines, it can be especially maddening. Start by locating one clasp or end and work that piece free. Once you get one chain separated, the rest is usually easier to deal with.
Use a twist tie, binder clip, or even a bread bag tab to keep each chain contained as you go. You can even clip one to a cup edge to hold it still while you work on the knot.

Once It’s Untangled, Clean It Gently
If you’ve used oil or powder, give the chain a quick clean. For most gold, platinum, and sterling silver, warm water and mild dish soap work well. Dip it in gently, swish it around, and dry it with a soft cloth. Avoid abrasive cloths or paper towels, which can scratch delicate finishes.
If your chain has pearls, gemstones, or is vintage or plated, it’s a good idea to double-check care instructions from a reputable jeweler like Jared before cleaning.

How to Prevent Future Tangles (and Save Your Sanity)
Once you’ve untangled your chain and sighed with relief, make it easier on yourself next time:
Store chains separately, ideally hanging or in individual pouches.
Use straws: Thread one end of a necklace through a plastic straw and clasp it. It’s a travel hack that really works!
Try jewelry organizers with hooks or snap compartments so each piece has its own space.
Use small plastic bags with the clasp outside the bag and the chain sealed inside—simple, effective, and tangle-proof.
For more storage ideas, check out these smart solutions from The Container Store.

Final Thoughts: You’ve Got This, Even If It’s Tiny and Tangled
Untangling a delicate chain can feel like solving a puzzle with invisible pieces. But the right tools, a little oil (or powder), and a calm mindset can make all the difference. Take your time, work gently, and remember—you’re smarter than the knot.
And once that necklace is free? You’ll feel like a hero. A sparkly, stylish hero who wins tiny battles with grace and baby oil.


Comments